OiRA tools generator Manual
General
This manual as about the ‘admin’ website (CMS) of the OiRA risk assessment platform, i.e. where developers create risk assessment tools that will be displayed on the ‘client’ website of the OiRA risk assessment platform, where end users (enterprises) access OiRA tools to perform a risk assessment.
Browsers
Preferred web browsers to access OiRA (both admin and client) are:
- Google Chrome version 70 or later
- Safari version 12 or later
- Mozilla Firefox version 60 or later
- Microsoft Edge
Using OiRA in the following browsers is possible, but deteriorated user experience is to be expected. Support for those browsers is no longer actively ensured by the software developers.
Microsoft Internet Explorer 11
Note
Any version of Internet Explorer lower than 11 will give serious usage problems.
Types of Login Accounts
There are two types of Login Accounts in OiRA:
- The country manager account: this account has to be created by EU-OSHA and will allow the country manager to create sector(s) in their own country
- A sectoral account: for countries/organisations for which the country manager does not apply, EU-OSHA will create a sectoral account
In both cases, EU-OSHA needs to create the account first, if it is not already present, because it is used for other OSHA sites such as the OiRA community site or the OSHWiki. Once your account has been created, you will receive an email at the provided address, containing the login information. Please note: Both your user name and password are case sensitive!
Country managers can create sectors by clicking the tab “User management” and then Add new sector.
When creating a new sector, be aware that the name of the sector will show up in the URL of the final published tool. Once this URL is created, the tool published and the first users have registered, it’s complicated to change to a new URL. Therefore carefully consider the name you give to that sector and make sure the naming follows the same rules for each sector in your country.
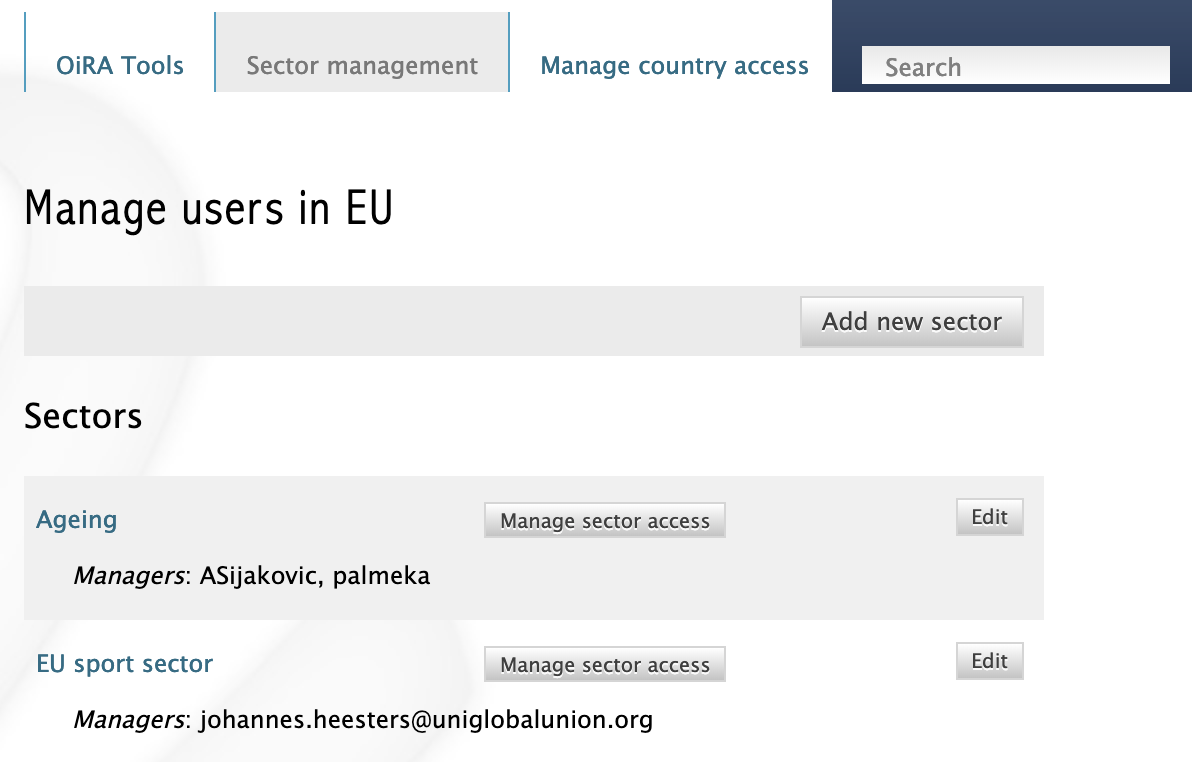
A country manager can create a sector via the “Add new sector” button. Existing sectors are listed below.
In order to promote a user to a sector manager, the country manager needs to enter this sector, and then use the “Manage country access“ tab. There, the country manager can search for the target user and use the Grant roles button. On the “Sector management” tab, there is also a shortcut (button) for “Manage country access“ for every sector. For any current user who has the Sector Manager role, the Revoke roles button can be used to remove this role again.

A country manager can grant and revoke the Sector Manager role
In similar fashion, any user can be made a Country Manager via the “Manage country access” tab on a country. This action can only be performed by an OiRA administrator.

A site administrator can grant and revoke the Country Manager role
Note
LDAP is a user Management data base set up by EU-OSHA. The LDAP allows users to use the same login for different EU-OSHA pages (e.g. EU-OSHA website, OiRA website, OSHwiki and OiRA content management system). In order to get access to any page linked to LDAP you must first register the respective person in the LDAP by sending the name and email address to the OiRA team. Please take into account that the registration process might take a few days.
Logging in
You start on: https://admin.oiraproject.eu

The OiRA Content Management System (CMS) login form
Log in with your User Name and Password. Did you forget your password? Click at the bottom of the page on ‘request a password reset’. Then add your user name and click on ‘Send’.

The OiRA CMS password reset form
You will be redirected back to the login page and a green bar will appear, confirming that an email has been sent to the address that you have provided. This email will contain a link that lets you reset the password.

The OiRA CMS password reset confirmation
If your login has been successful, a green bar with a confirmation will appear.
After logging in with a country manager or sector account, you will automatically be taken to the respective country or sector.

A sector overview page, after logging in
Here you can: click on a tool to edit it, or start a new OiRA tool by clicking on –> ‘Add New OiRA tool’ at the bottom of the page.
Logging out
Don’t forget to log out when you stop working in the OiRA tools generator. This is done with the button in the top right-hand corner: click on your login name and select ‘Logout’. After logging out successfully, you will be brought back to the login screen where you will see the notification ‘You have been logged out’.
Managing a Country
Countries cannot be created, as they have been set up by the OiRA Administrators for you. But some of a country’s settings will affect the behaviour of the OiRA tools created for it. Only a country manager can access the following section.
As a country manager you can change the settings for your country.
Sectors overview
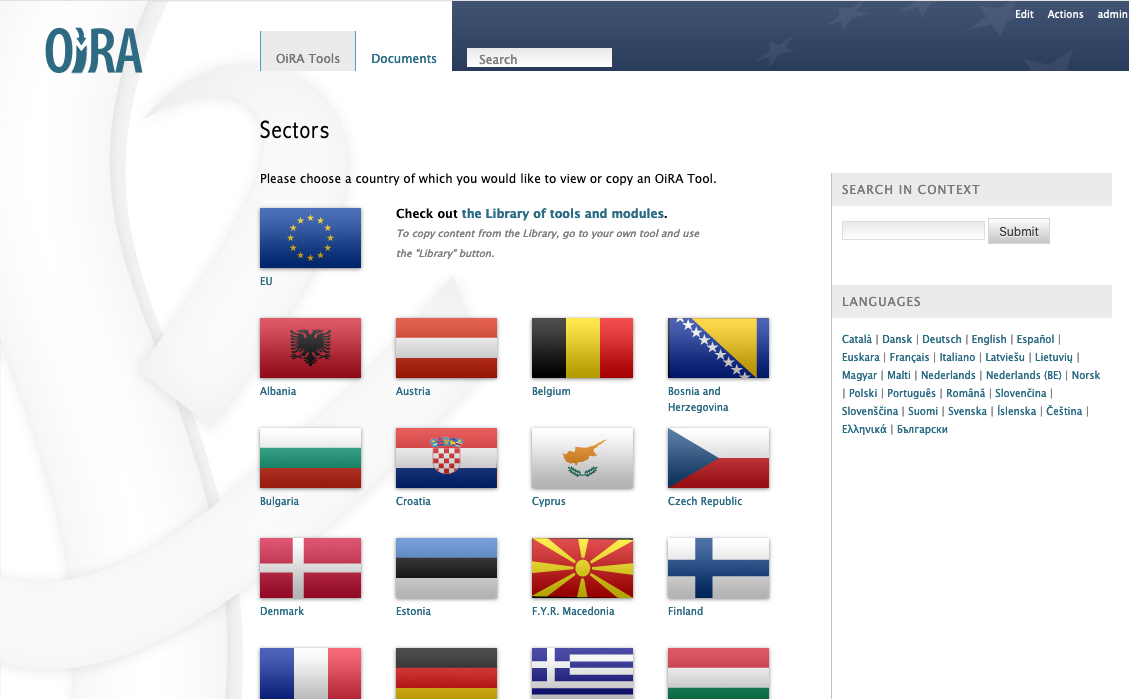
To open your country’s settings, select your country in the list of countries on the Sectors overview.
Country view
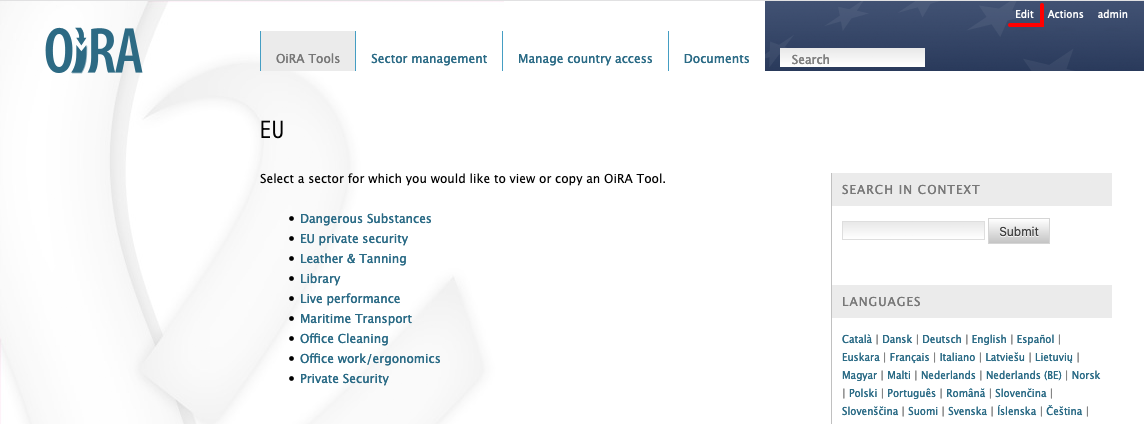
On the country’s view page click the Edit link in the upper right corner of the screen to change the selected country’s settings.
Country edit
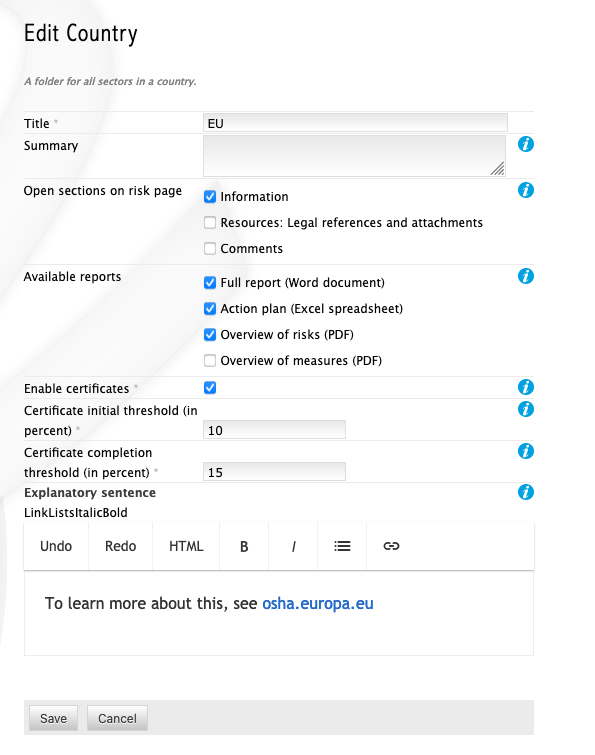
The form contains a number of different fields: texts for information, metadata and a number of settings that allow specific modifications to how the related OiRA tools behaves.
- Title:
The title of the country will be shown in the Sector overview below the country’s flag. Please do not change this title without any important reason.
- Expanded sections on risk page:
Here you can choose which information sections should be open by default on a risk identification page:
- Information
- Resources
- Comments
Sections not checked will be shown intially in collapsed mode, but the user can always open those sections with a click.
- Available reports:
Choose here, which reports are offered to the user on the Report page. There are 4 different types of reports available. By default, the first three are selected.
- Full report (Word document):
- Word / Office Open XML (.docx) that can be edited after download. It provides all information and input entered throughout the risk assessment process. This report is helpful for your users to provide evidence of the risk assessment for supervisory authorities (e.g. the labour inspectorate).
- Action plan (Excel spreadsheet):
- Excel / Office Open XML (.xlsx) that can be edited after download. It provides all information on all the measures you have chosen to implement. This report is useful for your users to actively follow up on the implementation of measures that they have chosen and to manage the problems/risks in their workplaces (specific tasks, expertise, responsibilities, deadlines).
- Overview of risks (PDF):
- PDF formatted report that cannot be edited after downloading it. It provides an overview of the risks identified. This report is useful for your users to get a quick overview of the status of risks in their workplaces, pass information to the people concerned and monitor whether risks/measures are properly dealt with.
- Overview of measures (PDF):
- PDF formatted report that cannot be edited after downloading it. It provides a quick overview of the measures to be implemented. This report is useful for your users to get a quick overview of the status of measures they have decided to implement, pass information to the people concerned and monitor whether risks/measures are properly dealt with.
- Enable certificates:
If this option is checked, your users will be able to obtain an official certificate of completion once they reach the threshold defined below. Before you enable certificates, please talk to the OiRA team at EU-OSHA, because you will have to define the fields that need to be filled by end-users in the certificate.
- Certificate initial threshold (in percent)
If “Enable certificates” is checked, add a number here. After a session completion rate is greater than this limit, the user will be informed about the possibility to earn a certificate.
E.g. if you put a 15 here, after 15% of the risk assessment has been filled in, the user will be shown an informational text on the status page. The text informs the user about earning a cerificate.

Status: initial treshold reached
- Certificate completion threshold (in percent)
Add a number for the certificate’s completion limit (in percent) here. After a session completion rate is greater than this limit the user will earn a certificate.
E.g. if you put a 50 here, after 50% of the risk assessment has been fulfilled, the user will be shown another informational text on the status page. This text informs the user that he now earned the certificate. From now on a button is offert to view and print the certificate.

Status: completion treshold reached
- Explanatory sentence
- The text entered here is shown to the user after reaching the initial threshold. You can use this to point to an external website that provides more information.
Setting up a new OiRA tool
A new OiRA tool is created in two steps. First, you define the basic information such as the name of the tool and which kind of evaluation method should be used. Please note that as for the sector, the name of the tool shows up in the final URL and cannot be changed by you later. The evaluation method determines what kind of questions the end-user will see to evaluate a risk. It can only be set during creation and cannot be changed later.
In the second step, you provide more details about the tool, such as introductory text, information about its language and further options. You will be able to modify those settings at any time.
Adding a new OiRA tool
On the overview page of the chosen sector, either click the link “add a new OiRA tool” at the bottom of the screen, or use the Actions menu at the top right to “Add new -> OiRA tool”.
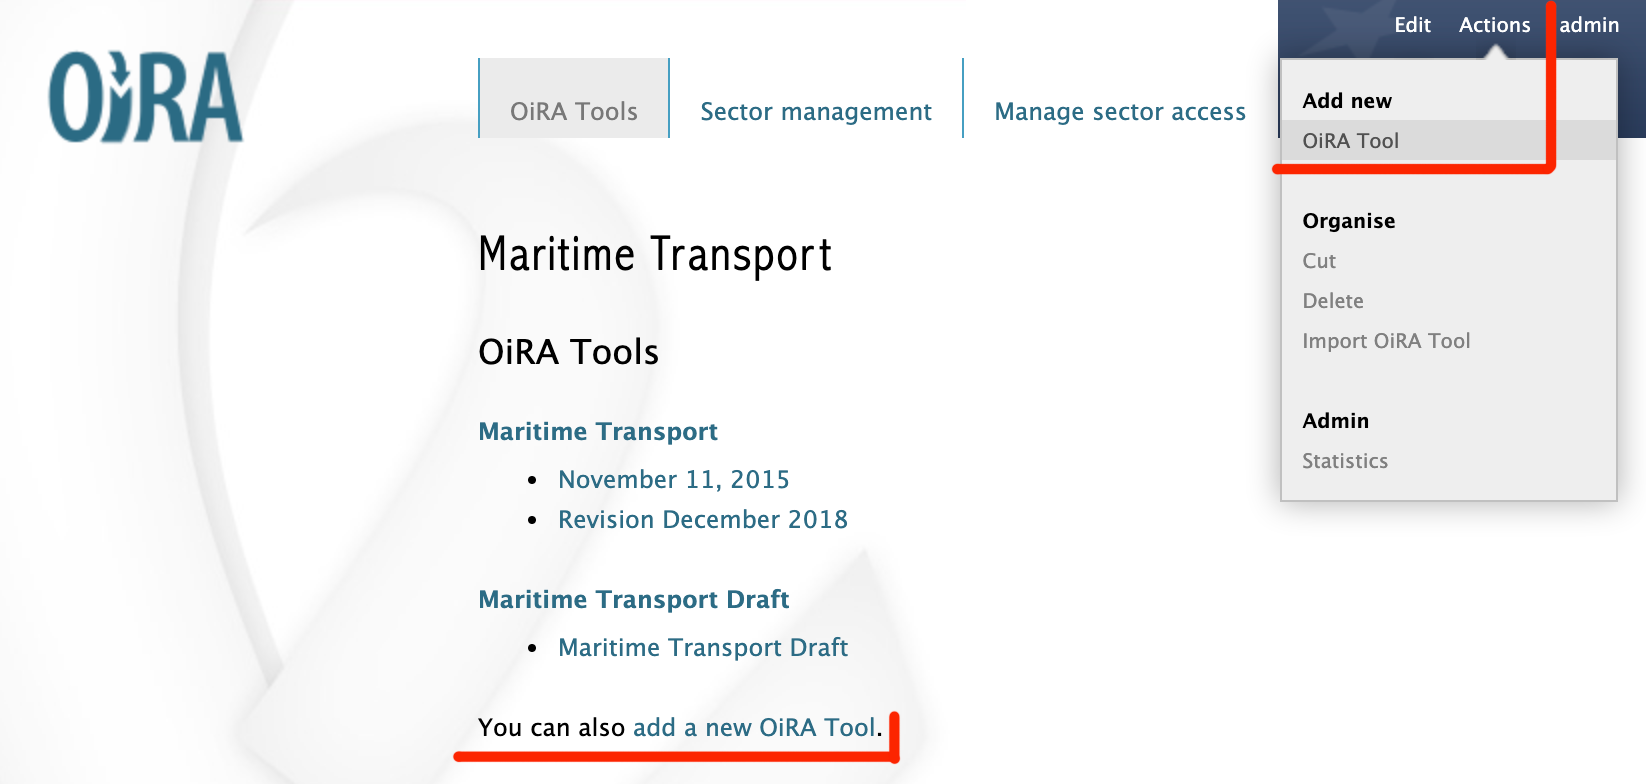
Adding a new OiRA tool
You will then be brought to the form below:

The “new OiRA tool” form
Give the OiRA tool a name (title). This name will be shown to the end-user in the overview. Example: Hairdressers Risk Assessment Tool 2010.
Note
It is not possible to change this name later on, since it will be used to create the URL for this tool in the client. In case a change of the tool’s name (title) is necessary, please contact EU-OSHA for assistance.
When creating a new OiRA tool you can choose from the following three options:
- Create a new OiRA tool from scratch
This option is recommended when you already have an existing risk-assessment tool from outside of OiRA and would like to transfer this / add the contents to OiRA.
- Base my OiRA tool on an existing OiRA tool of my organisation
This option is recommended when you are planning to revise the contents one of your already published OiRA tools.
Note
When dealing with minor amendments, e.g. typos, it would be best to implement these in the existing OiRA tool and simply republish it.
Important: When dealing with bigger changes on an already published OiRA tool (including moving modules, risk statements or solutions/measures), please check the chapter about the re-working a published OiRA tool.
- Base my OiRA tool on an existing OiRA tool of another organisation
You can decide which existing OiRA tool is most suitable for your sector. You can copy and modify it, and thus avoid having to create one from scratch. You have to determine the amendments for your own sector. For example, the butcher could copy and modify the OiRA tool of the fish retailer.
There is an alternative option for benefiting from already available content, which is explained in the chapter about the Library.
Note
The OiRA philosophy is based on open source, which means that you have the right to copy text from any other published OiRA tool and also from the OiRA library. However, be aware that this is not applicable to pictures used by other OiRA partners! You will always have to check the rights for these pictures before including them in your tool.
After you have copied an existing OiRA tool, any changes made to the ‘source’ OiRA tool will not automatically be reflected in your own OiRA tool. When, for example, the butcher has copied the OiRA tool of the fish retailer and the fish retailer implements changes in their OiRA tool afterwards, these changes will not appear in the OiRA tool of the butcher.
If you would like to copy the OiRA tool of another sector as a starting point, you need to first select the country in the drop-down menu and subsequently the sector of your choice.
If this sector provides more than one version, you will see all versions listed, so that you can chose the appropriate one.
Then click on “Create” at the bottom of the page. Please note that setting up a new OiRA tool can take a while if you’ve chosen to copy from an existing OiRA tool.
In case of a new OiRA tool you will see a screen as shown below. Your new tool appears in the navigation in the left column and also in the list of tools and versions from your sector in the right column. The first version, called “Standard”, has automatically been created. More details about versions are explained in the chapter on OiRA tool versions.
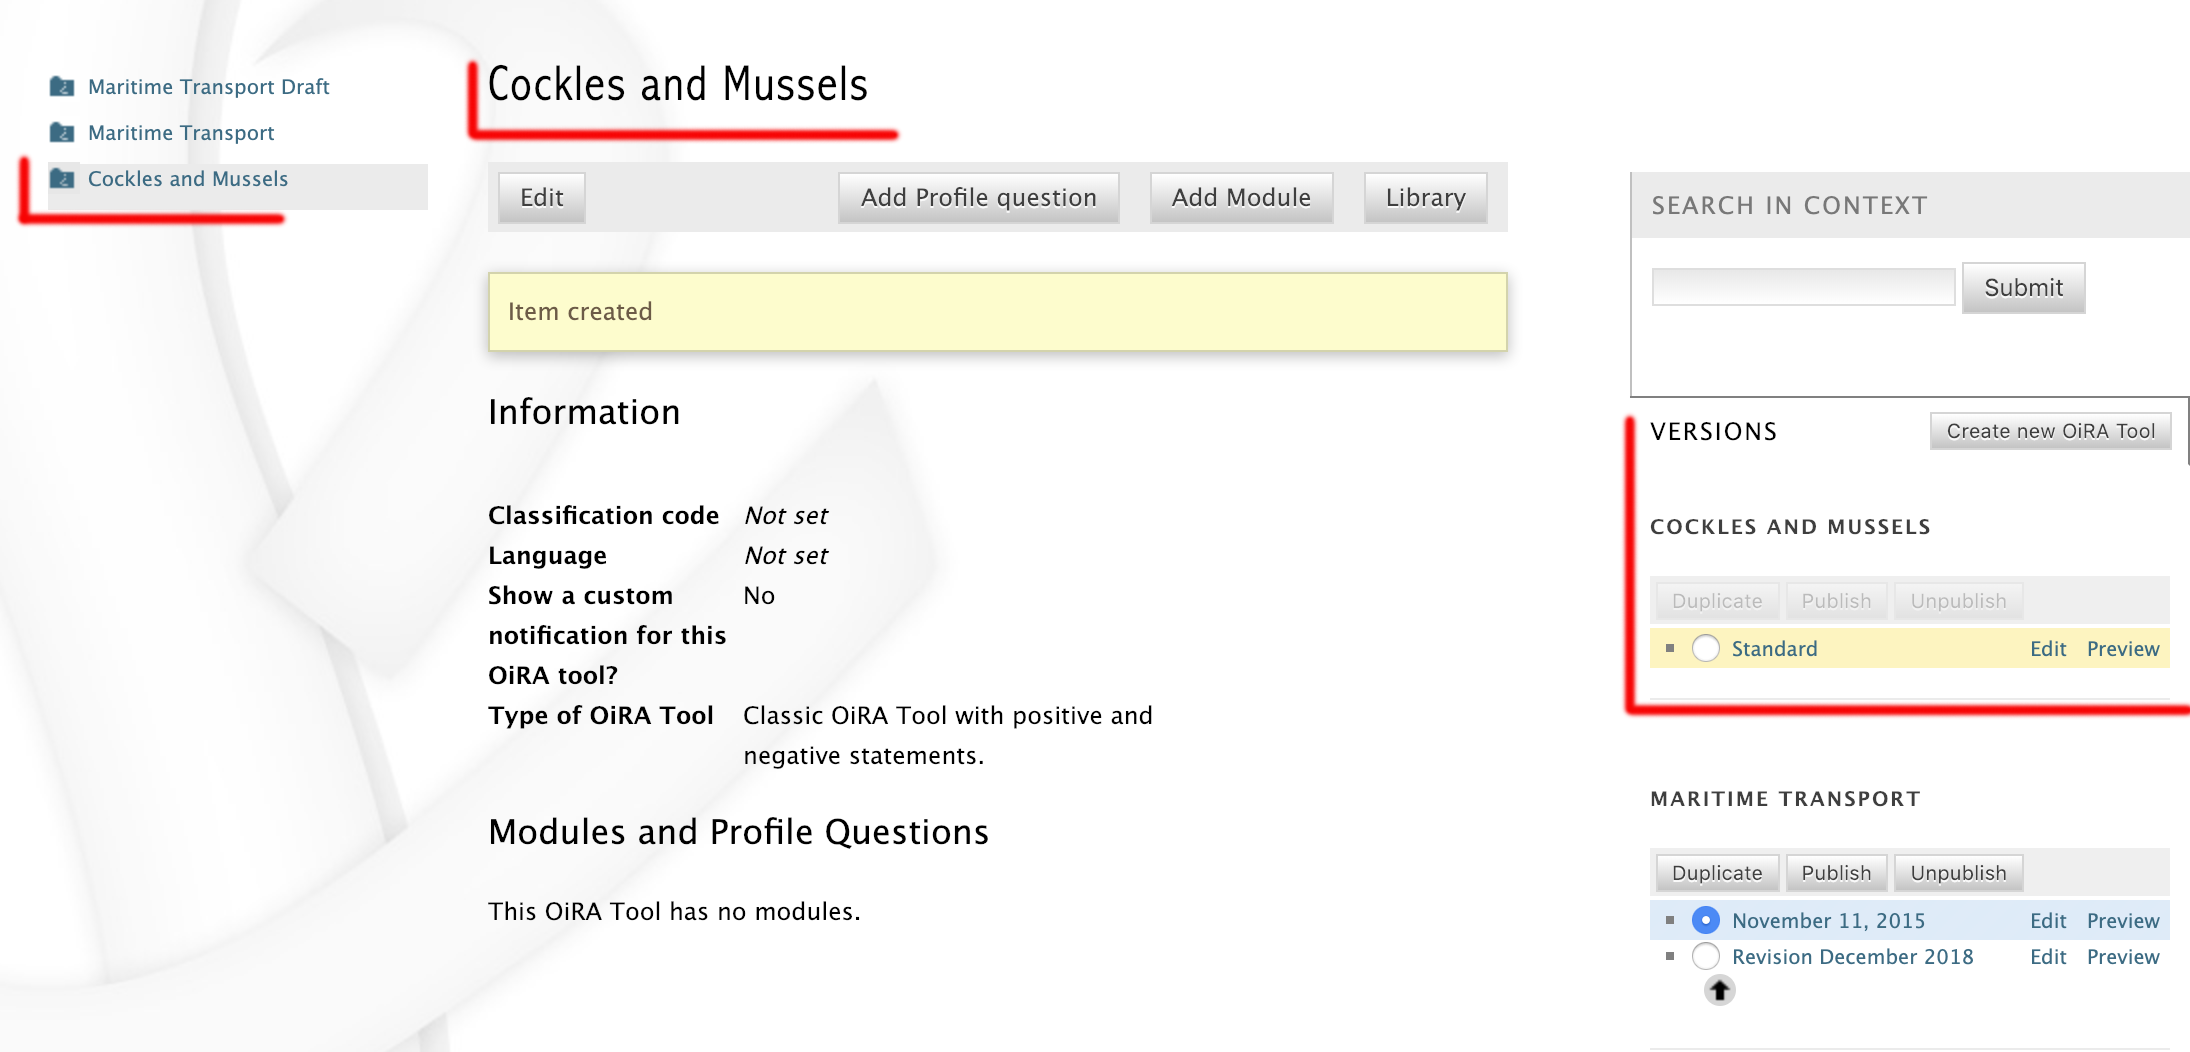
A newly created OiRA tool
Editing the details of an OiRA tool
When on the context of an OiRA tool version, click the Edit button or hyperlink, to open the edit form.

The location of the edit button and link
You will then see a form similar to the one shown below.

An OiRA tool version edit form
The form contains a number of different fields: texts that will be shown to the end-user, metadata and a number of settings that allow specific modifications to how the OiRA tool behaves.
Text fields and metadata
- Version name:
You can modify the version name of the OiRA tool. The name you enter here will not be visible to the end-user and is mainly intended to help you manage the different versions. When you create a new OiRA tool, its first version is automatically created and given the name Standard.
- Summary:
A short description of the contents of the OiRA tool. This text will be displayed to the end user.
- Introduction text:
Please provide some relevant and encouraging information for end-users of the OiRA tool. For example:
- The importance of risk assessment
- The fact that risk assessment is not necessarily something complicated (to demystify risk assessment)
- The fact that the tool has especially been conceived to meet the needs of the sector’s enterprises.
- We recommend to specify here which end-users are expected to use the tool (i.e. who is the end-user of the tool?).
Please adapt this text according to your sector needs, but try to keep it short.
You may add hyperlinks to pages and files; for example a file containing an employee questionnaire which social partners in your sector have decided to be important.
If you do not edit the Introduction field, the default text will be displayed once the tool is published.
- Language:
Choose the language of your OiRA tool from the drop-down menu. This action is mandatory in order to ensure that the appropriate language of the OiRA interface is selected.
- Classification Code (optional):
Write the NACE-code of your sector.
Fields that allow special behaviour
- Type of OiRA Tool
This setting determines how an OiRA tool is presented to the user.
- The Classic type will show the risk statement, the Yes / No question, plus the evaluation, where applicable. If the user answers with “No” or if the risk is a priority risk, then the risk will appear in the Action Plan, so that measures to mitigate it in the future be defined.
- An OiRA tool with Measures already in place takes different approach: Under the risk statement, the user can state which measures to mitigate the risk are already in place now. All “common solutions” provided by the tool creator can be selected, but the user can also describe their own solutions. The Yes / No question follows the list of those measures and asks the user if the already implemented measures are sufficient to take care of the risk, or if further measures need to be planned for the future. If the answer is “No, not sufficient”, then risk appears in the Action Plan. That means, this is the same behaviour as for the “classic” type).
While the type of tool can be changed at any time, it is important to be aware of the effects this has. Special care needs to be taken that the risk statements match the type of the tool.
If you are unsure what option to take, chose the “Classic” version.
For more details on this alternative tool type, see the chapter OiRA tool with measures already in place.
- Handling of measures text (if measures-in-place are used)
This setting defines how the “Measures in place” options are displayed to the user.
- Choose Simple if the texts for Description and General Approach are identical in your measures.
- Choose Full if the texts in General Approach provide more details than the Description.
If you do not have any further informative text to display except the measure’s description, the option Simple might be the better variant.
For more details on how the texts are displayed for both versions, see the chapter OiRA tool with measures already in place.
- Integrated Action Plan
If selected, the option to plan measures will be offered directly on the Identification page. There will be no separate Action Plan step in the navigation.
You can smoothly change this option also for existing tools - the data already gathered by the users will not be lost.
For more details on how the action plan is integrated in the identification page, see the chapter OiRA tool feature “integrated action plan”.
- Show a custom notification for this OiRA tool?
With this setting, you can define that all end-users of this OiRA tool will see a notification message with custom text when they use the tool.
If you tick the checkbox, you will see two more fields:

Enter title and text for a custom notification
- Tool notification title
- Enter the headline for the notification.
- Tool notification message
- Enter the text that should be shown. You can use the usual formatting in the message, e.g. paragraphs, lists and bold text. You can also include links, so that you can provide a link to a new version of the tool or similar.
If the custom notification was activated, the end-user will see it in the “Preparation” screen of their risk assessment. It will be shown both on new and on already existing risks assessments made with this OiRA tool.

The notification that the user gets to see
Include a logo which links to an external website: (Optional)
It is possible to include a logo in your OiRA tool which links back to a selected web page. This logo will appear on the first page of the specific tool that end-users visit as soon as they start with a risk assessment (the Preparation step).
If you tick the checkbox “Include a logo which links to an external website”, 3 more fields will appear.
This option is meant to have the possibility to point out the national contributors, sectoral social partners, funding parties etc.

An example of end-user facing OiRA risk assessment site (OiRA client), showing the logo, caption and link on the “Learn more about this tool…” screen
- External site URL
- This is the URL (website address) of the external website you would like the logo to link to.
- External site name
- This is the name of the website or its organisation
- External site logo
- Here you should provide an image file of the logo

The 3 extra fields for adding a logo linking to an external website
- The criteria applied to evaluate risks are specific of this tool? (If not, the common criteria descriptions will apply).
With this setting, the hints displayed to the end user when a risk’s severity needs to be calculated can be customised.
On a regular risk that is set to be “calculated” for its severity, the end user is presented with some questions in case the risk is present. The answer to those questions are used to calculate the severity. Next to every question, a help text is available that gives some hints to the user.

The hint for one of the questions to evaluate the severity of the risk (standard text)
In case a tool creator wants to present different hints to the user, they can use this option to set custom texts.

Entering a custom hint text for the evaluation questions
The end user will then see this text in the Evaluation box instead of the default one.

A hint with custom text for one of the questions to evaluate the severity of the risk
Formatted Text
In certain forms in the OiRA tools generator, you will see larger fields in which you can add both plain and formatted text (also known as rich text).
You will be able to identify this option from the editor-bar directly above such fields (the “formatting bar”). In case there are multiple fields for rich text on a single page, each of them will have its own formatting bar.

Example of a rich text field with the formatting bar above it
It is important that you only copy a not formatted text into the field. Pasting formatted text from another program, e.g. Word, Excel, etc. may later cause displaying problems in the OiRA website for end-users (client), since it already contains markup code that can disrupt the correct display.
You will not see this code when you paste the text onto the OiRA tools generator, but it does exist “underneath” the text. Hyperlinks also have a fixed format in Word (colour and underlining), which is difficult to change after pasting onto the OiRA tools generator. It is best to insert hyperlinks after the text has been entered correctly into the OiRA tools generator (see the explanation further below on how to create links).
Therefore, please keep in mind that pasting text from another program can cause unexpected effects. This applies to all fields in the OiRA tools generator where formatting is possible. This is why we advise you to type the text into the field without formatting, instead of pasting from a program. If you decide to paste text from a program, make sure that the text is not formatted. For instance, you can copy text from a Word document to a Notepad document (Notepad is a standard program available in almost all computers); Notepad does not support formatting the formatting will be deleted, and you can copy again from Notepad to OiRA.
The formatting bar offers the following options:
- Bold:
You select (by dragging the mouse) a portion of text and then click B in the formatting bar above the field.
Selecting the same text again and clicking B will undo the bold font (this applies to all formatting options).
- Italic:
You select (by dragging the mouse) a portion of text and click on the I in the formatting bar above the field.
- Listings:
You select the required lines and click on the icon with the dots and stripes. Then chose either Unordered list for a list with bullet points or Ordered list for a numbered list.
- Hyperlink (to a website):
First type the text on which you would like to apply the hyperlink, for example: “Also see this website”. Then highlight the text (by dragging the mouse), click on the button with the chain icon in the formatting bar and select “Insert link”

Adding a hyperlink to formatted text
A new window will then open which allows you to add the URL. The Text of the link is pre-filled by the text that you had highlighted.

Filling in the details for a hyperlink
- Text:
- The title will appear in the tooltip when a person hovers their mouse cursor above the hyperlink.
- Open link in new window:
- Clicking on the link will open a new web page. By opening that web page in a new browser window (or tab), your user will not lose the current open page (i.e. the OiRA risk assessment site).
To modify a link or to delete a link simple click on the link. A context menu opens with the options to Edit (opening the window you already now from adding the link) or to Unlink (removing the hyperlink but keeping the text):

Adding a hyperlink to formatted text
Note
URLs are the addresses of websites or web resources. Therefore, if you want to add a hyperlink, it must point to a website address. If you would like to offer actual documents (e.g. Word or PDF files) on your OiRA tool, you first have to place the documents onto a website (e.g. the site of your sector’s organisation) and then create a link to these files as described above.
With ‘Ctrl-z’ (the Ctrl key together with the z key) you can undo formatting and textual changes you made in the formatted text field (multiple changes can be undone, as long as you haven’t clicked ‘Save’).
In addition, you can click the right button of your mouse when you are in a field, which will provide you with an applicable menu. When you select a word you will also see options such as: cut, copy, paste, etc.
Alternatively, you can use the following keyboard shortcuts:
- Copy: Ctrl-c.
- Paste: Ctrl-v.
- Cut: Ctrl-x.
- Select all: Ctrl-a.
- Undo: Ctrl-z.
- Search (within the field): Ctrl-f.
OiRA tool versions
An OiRA tool should be revised periodically, usually to adapt it to the latest changes in legislation or other environmental changes. The OiRA tools generator makes this easy by allowing you to create and manage several different versions of your OiRA tool.
When you create a new OiRA tool, the first version is automatically added. By default, it is titled Standard. In the sector overview page, we’ll see the heading of the OiRA tool (here called “Cockles and Mussels“) as well its first version (“Standard”).

The new OiRA tool together with its first version
Having a second version of your tool is a very useful feature for a variety of reasons.
- Whenever you need to make risky or invasive changes to your OiRA tool, you can create a new version to experiment with, while having the peace of mind that there is still a fully functional copy of the currently published OiRA tool.
- Having different versions, together with the preview function, allows easy and rapid prototyping without affecting the OiRA tool currently available to the end-users.
- Once you have tested a new version, you can publish that specific version, thereby replacing the previous one.
- Older versions can be kept for documentation purposes, indicating the history and eventual changes brought to the OiRA tool.
Updating an existing OiRA tool version usually requires you to only do minimal changes to adapt it to latest amendments in legislation or new findings. In this case you don’t need to create a new OiRA tool version; instead you can apply those small changes directly to the OiRA tool and publish it again.
Steps for creating a new OiRA tool version:
- Make sure you are on the context of an OiRA tool or one of its versions.
You will see on the right side a column named VERSIONS.
Mark an OiRA tool version by clicking on the radio button next to its name.

Creating a new OiRA tool version by copying an existing one
Click the Duplicate button.
Provide a Title

The “new OiRA tool version“ add form
Make sure the correct base revision is selected. Base revision refers to the version of the tool you want to base the new version on. In our example we only have one version (Standard).
Click the Create button.
Now you have a second OiRA tool version available and on which you can make changes that won’t affect the original version. Once you are done, you can publish it and it will replace the existing OiRA tool in the client.
Colours used on the right hand menu:
The tool shown in yellow on the right hand menu is the tool version you are working on, and tools shown in blue on the right hand menu are tools that are published.
A tool shown in yellow and blue stripes is the published tool that you are currently working on.

The tools and their versions, with colour coding to indicate their status
Marking an OiRA tool as obsolete
See the section about communicating tool changes to learn how to mark an OiRA tool as obsolete and about the consequences this has.
Creating the structure of an OiRA tool
When completing/modifying the content it is essential to first consider the structure that you will give your OiRA tool.
With structure, we refer to the layout of profile questions, modules and submodules, as well as their contained risks and measures.
Within a module or profile question, you can either add submodules or risks; a combination of both isn’t possible.
Copying or moving elements inside an OiRA tool
When you base the OiRA tool on an existing OiRA tool, it will already have a structure. Main modules and submodules may be added to, or removed from any part of this structure. You can also copy modules from any OiRA tool (your own or others) and paste into OiRA tools under your management (visible on the overview on the left). Additionally you can move modules from your tools (cut and paste) to another version of your tool.
Click on the item which you would like to copy or move, and open the menu Actions (top right, next to Edit). Choose the desired option (Copy or Cut, go to the area where you want to move it (click in the desired OiRA tool and folder) and choose Paste from the Actions menu.

Cutting and Pasting items is done from the Actions menu
Using the Library to copy useful content
Even though sectors and legislation differ across states, a lot of problems and risks are common, as are the proposed solutions. For this reason, EU-OSHA provides a library of risk assessment modules that can be re-used by all tool creators. The library items usually do not contain legislative information.
Note
Library tools are normally either English translations from national tools that have been published or they are standard modules developed by EU-OSHA. Please note that library tools need national adaptation, in terms of language, legislation and critical revision of all items that are going to be copied.
To get an overview of what the library contains, you can use the link on the start page of the CMS and browse the contents (https://admin.oiraproject.eu/tool-creator/sectors/eu/library).

The link to the library on the start page of the CMS
The purpose of the library however is to provide easy access for copying relevant content to your own tool. When you are browsing your own tool, you will see a button “Library” in the same bar that also contains the “Edit” button.

Access to the library inside an OiRA tool - here on the top level of a tool
After clicking this button, you will see the contents of the library ready for you to insert into your own tool. Only one library tool can be displayed at a time, therefore you can switch to the tool that you need by using the selector. For every item that is available for copying, you will see an “Insert” button next to it.

The library contents, ready to be inserted into your tool
The selector lets you access all tools that are available in the library.

The selector to switch between tools inside the library
Once you have decided which content you want to copy into your own tool, click the Insert button. You will then be taken back to your own tool, where you will see a copy of the module or risk that you have just copied.

A module has just been copied from the library
The library only allows you to insert that type of content that is allowed by the current context. That means,
- if you open the library from the top of your tool, you will be able to insert modules and profile questions
- if you open the library from inside a module that already contains risks, you will be able to insert risks
- if you open the library from inside a module that contains submodules, you will be able to add modules
In the following screen-shot, the library was opened from inside a module that already contains some risks. Therefore, only the risks inside the library have the Insert button, but not the modules.

The library, opened from a module that already contains risks
Note
All content that you copy from the library becomes part of your own OiRA tool. You can then proceed to modify it as it suits your needs. There is no connection to the content inside the library. That means if the library gets updated, your copied content will not be affected.
Profile questions
What are profile questions?
Profile Questions are special modules whose contents may be skipped entirely or repeated a certain number of times.
Profile questions are posed to the end-user before they start the risk assessment, during the preparation phase.
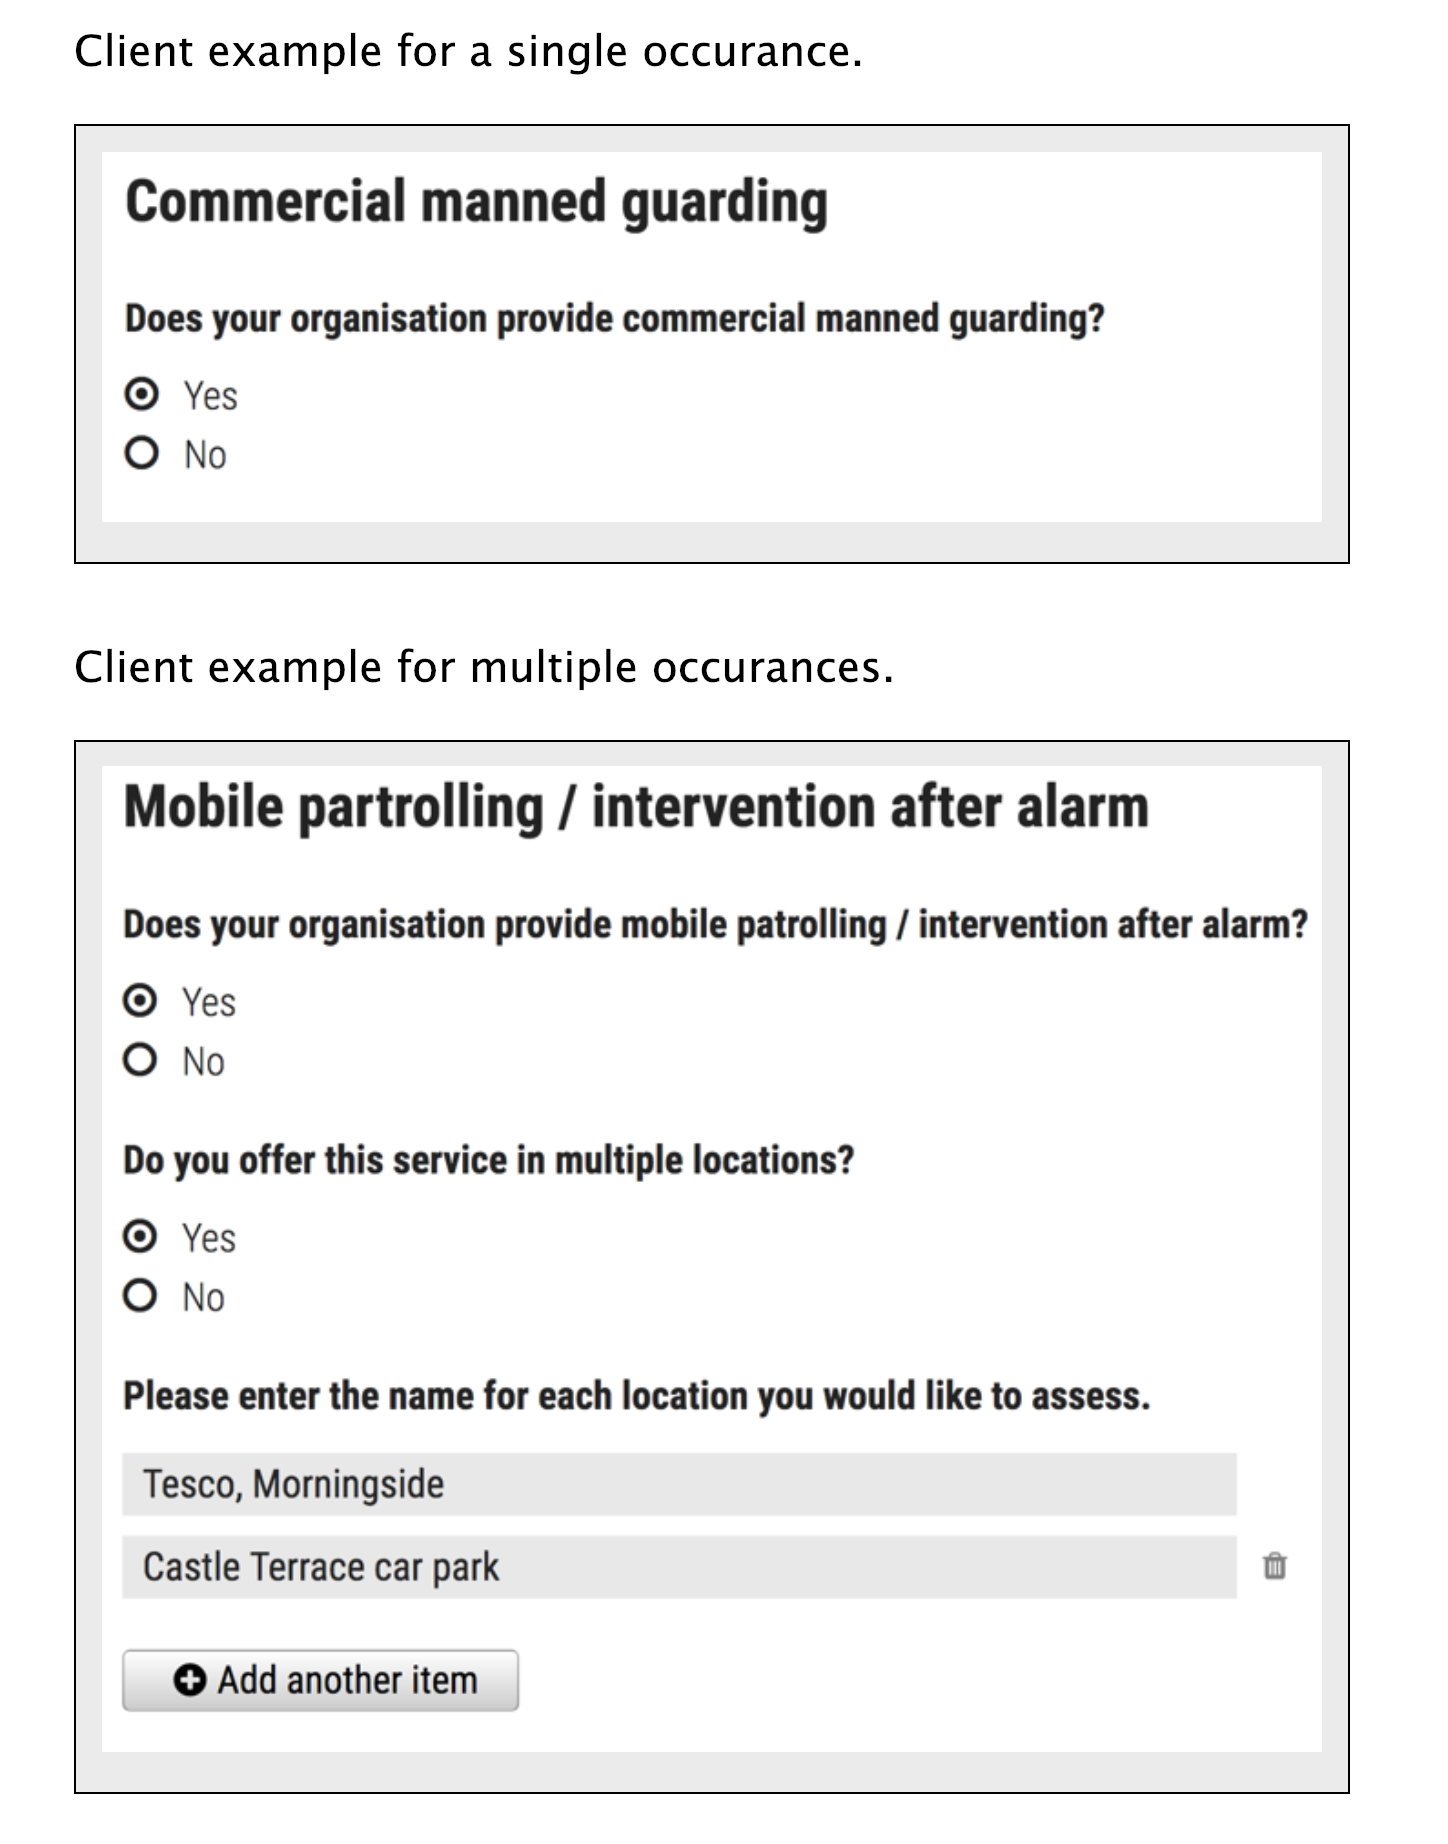
A profile question starts by posing a question, the answer to which will determine whether the profile question’s contents will be skipped or not.
- Do you have a store?
If the end-user answers No, the submodules and/or risks inside that profile question will not appear during the subsequent risk assessment.
If the end-user answers Yes, the profile question’s contents will be included in the risk assessment and another question is posed to determine the amount of times the contents of the profile question needs to be evaluated.
- Do you have multiple stores?
If the end-user answers No, they must still provide a name for the single instance or occurrence referred to by the profile question (in this case, one store).
If the end-user answers Yes, they will be prompted to provide a name for each of the repeating instances or occurrences (i.e. for each store).
As you can see, profile questions enable the end-user to include or exclude certain parts of the risk assessment tool, depending on whether they apply to the their particular situation or not.
They can also be made repeatable, allowing the end-user to name the repeating instances with names relevant to them (e.g. city centre bakery, bakery headquarters, bakery city park).
Through this, the (sub)modules and risks associated with this repeatable profile will be repeated in the tool - once for each affected instance. Imagine this to be the same as if you would make paper copies of a certain part of a checklist, because it needs to be completed for each location’s characteristics.
Posing profile questions is particularly useful in sectors where it is probable that a substantial number of modules with risks aren’t relevant to all companies. If you expect that most companies will complete practically all modules, posing profile questions will be unnecessary, unless you would like to provide the end-user the option of completing part of the modules multiple times.
A profile question example
Adding profile questions
You can create profile questions as follows: click on the top level of the OiRA tool (top link in the navigation tree on the left-hand side) and in the grey bar underneath the title you will find the button Add Profile Question.

Button for adding a profile question
You will see the following page:

The profile question add form
The following fields are available:
- Title:
In the client, the title will appear prominently above the profile question. The end-user will see it in the beginning of the OiRA tool, during the Preparation phase of the risk assessment, and also inside the navigation of the tool.
Don’t put a full-stop after the title. A number isn’t needed, either.
- Question:
This is the question that determines whether the profile question’s contents will be skipped or not. This question appears under the profile question title, at the beginning of the OiRA tool, during the Preparation phase.
For example:
Does your organisation provide mobile patrolling?
- Ask the user about (multiple) locations?
If this setting is enabled, the user will be asked to provide a label for each location / instance that will be checked against the contents of this profile. Using this settings makes the profile repeatable.
- Multiple item question:
This question will be posed to the user only if they have answered Yes to the preceding question, and must be designed to determine whether the profile question contents needs to be repeated or not.
For example:
Do you offer this service in multiple locations?
- Single occurrence prompt:
This is the question that will be posed to the user if they have answered No to the previous question, i.e. there is only one instance or occurrence. It must prompt the user to provide a name for that single instance/occurrence.
For example:
Please enter the name for the location you want to assess
- Multiple occurrence prompt:
This is the question that will be posed to the user if they have answered Yes to the Multiple item question, i.e. there is more than one instance or occurrence. It must prompt the user to provide a name for each instance/occurrence.
For example:
Please enter the name for each location you want to assess
A profile question acts as a module, in the sense that it is a container. You can now add modules and/or risks to it. Do that by clicking the “Add Module” or the “Add Risk” button.

The buttons for adding a risk or module
Modules
When the module structure is clear and the decision has been made whether profile questions will be posed or not, it is a good idea to first completely build the module structure into the OiRA tools generator. Only after that should you add the risks to the modules. This enables you to get a good overview of your structure before starting to deal with the more detailed aspects related to the risk statements.
Adding a module
When you are on an OiRA tool, or inside a profile question, or inside a module that does not contain any risks, you can create a new module by clicking the Add Module button, as shown in the screen-shot below.
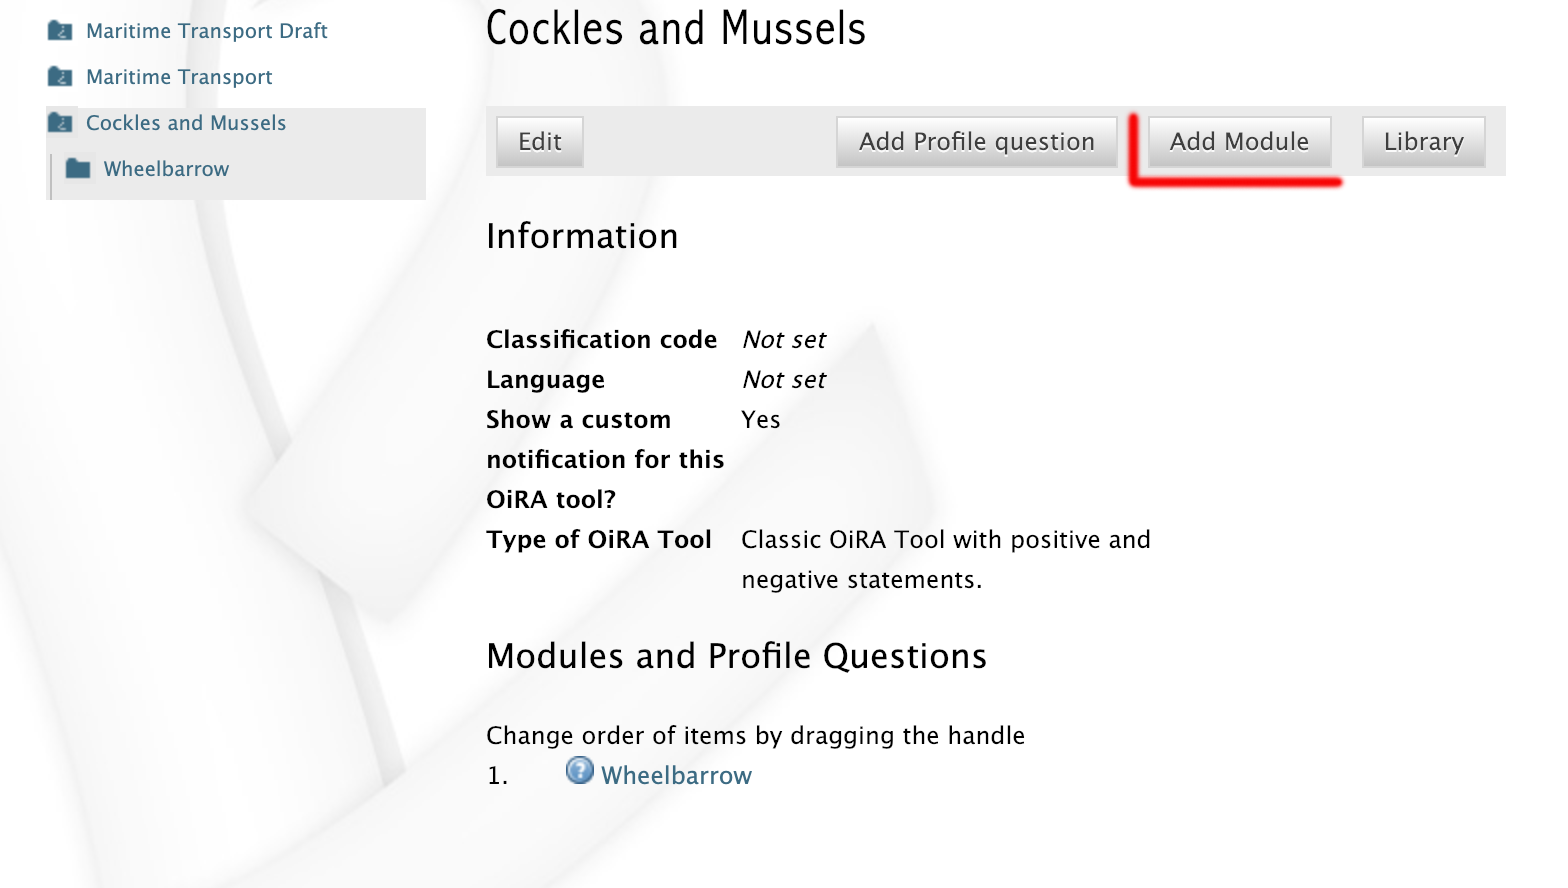
The location of the “Add Module” button
You will the see the following form:

The Add Module form
The following fields are shown:
- Title:
- The title of this module, for instance Storage room, Working at height or Physical Work, etc. The end-user will see this title at the top of the page for the duration of answering this module’s risks. Don’t put a full stop after the title. A number isn’t needed either, since the module will be numbered automatically. Keep it short and simple. Use everyday language and make sure the end-user will immediately understand it.
- Description:
- Provide a short general description of the contents of the module. This is a formatted text field, so you can create links to useful external pages providing additional relevant information.
- This module is optional:
Please refer to the explanation on optional modules below.
Ticking this box will make the module optional, determined by the answer to a ‘filter question’ posed to the user.
- Image file:
- You can add an image that will be shown along with the module’s title and description. Please use a JPEG, PNG or GIF file and make sure that the image is of high quality and is not scaled down. Large images will automatically be scaled to the correct size.
- Solution overview:
At the modular level, generic/orienting solutions could be provided. For example it could be important to stress the importance of avoiding the risk, substituting the dangerous by the non-(or less) dangerous, combating risk at source. The solution could focus on different aspects: technical and/or organisational, …
The text you enter here will appear in the Action Plan phase. This Overview of solution at module level should be compatible/complementary with the measure(s) proposed at risk level.
- Additional content
You can upload up to four files that might supplement the contents of the module or aid the end-user in their risk assessment. These files will be shown on the module in the client to the end-user. If you do not provide a content caption, then the original file name (as it is named on your computer / device) will be shown to the user:

“Additional content” files shown on a module
Once you have filled in the forms, click Save at the bottom of the screen.
To add more top-level modules, click again on the top link in the navigation tree on the left and then click the button Add Module.
To add a submodule to the current module, click on the module where you want to add the submodule. Then click Add Submodule on the top bar.
You can modify modules and submodules as well as all other information you enter at a later stage by clicking the Edit button.
With the Action menu (top right) you can cut, copy and delete modules and by dragging them (up or down) you can change order of appearance. You should do this before publishing the OiRA tool.
Optional modules
Instead of determining which modules apply to the end-user by asking profile questions, there’s also the possibility of initially offering all modules and giving the end-users the option to skip a module just before starting it.
During the Identification phase, while the end-user is going through the structure and comes upon an optional module, they will be posed a question designed to determine whether that module is applicable to the specific end-user (and therefore whether it may be skipped or not).
This so-called ‘filter question’ for optional modules must be expressed in an affirmative way.
For example:
Dangerous substances are used
As such, the end-user will initially deal with the module Dangerous substances. If the end-user answers with No to this statement they will skip the whole module and its contents. It isn’t possible to skip modules by answering Yes to a filter question, only by answering No.
The optional module feature can be used also at sub-modules level.
Take into account that filter questions for optional modules should NOT refer to risks. For risks you can use the “not applicable” option (see more information below).
Only one filter question may be used for each module/sub-module. It is always the first question (as affirmative statement) that is displayed in the module.
It is useful to start determining which modules could or should start with a filter question during the preparation of the module structure. See above for information on how to enter an optional module.
If you have decided to make the module optional by ticking the box “This module is optional”, an extra field labeled Question will appear, in which you must write the ‘filter question’ as an affirmative statement.

Making a module optional
The answer has to be Yes or No. If No is answered, the end-user will skip the module.
Note
Optional modules give the possibility to the end users to adapt the content of the tool to their needs while going through the tool / its modules. Profile questions give the possibility to the end user to adapt the tool to their needs at the beginning of the risk assessment process, directly after logging in to the tool. Also profile questions can be used in a more complex way to have modules repeated (e.g. to get the same questions again for different locations).
Risks
Adding Risks
A risk is always placed inside a module, submodule or profile question. Make sure you are in the correct context by selecting the module, submodule or profile question from the left-side navigation.
Note
You cannot add risks in the top level of the OiRA tool. You need to create a module or profile question first.
Once on the correct context in which you want to add the risk, click Add Risk in the grey bar underneath the title.
You will then see the following form similar to this (the form might slightly differ in case you have chosen the 2-criteria evaluation when creating the tool):
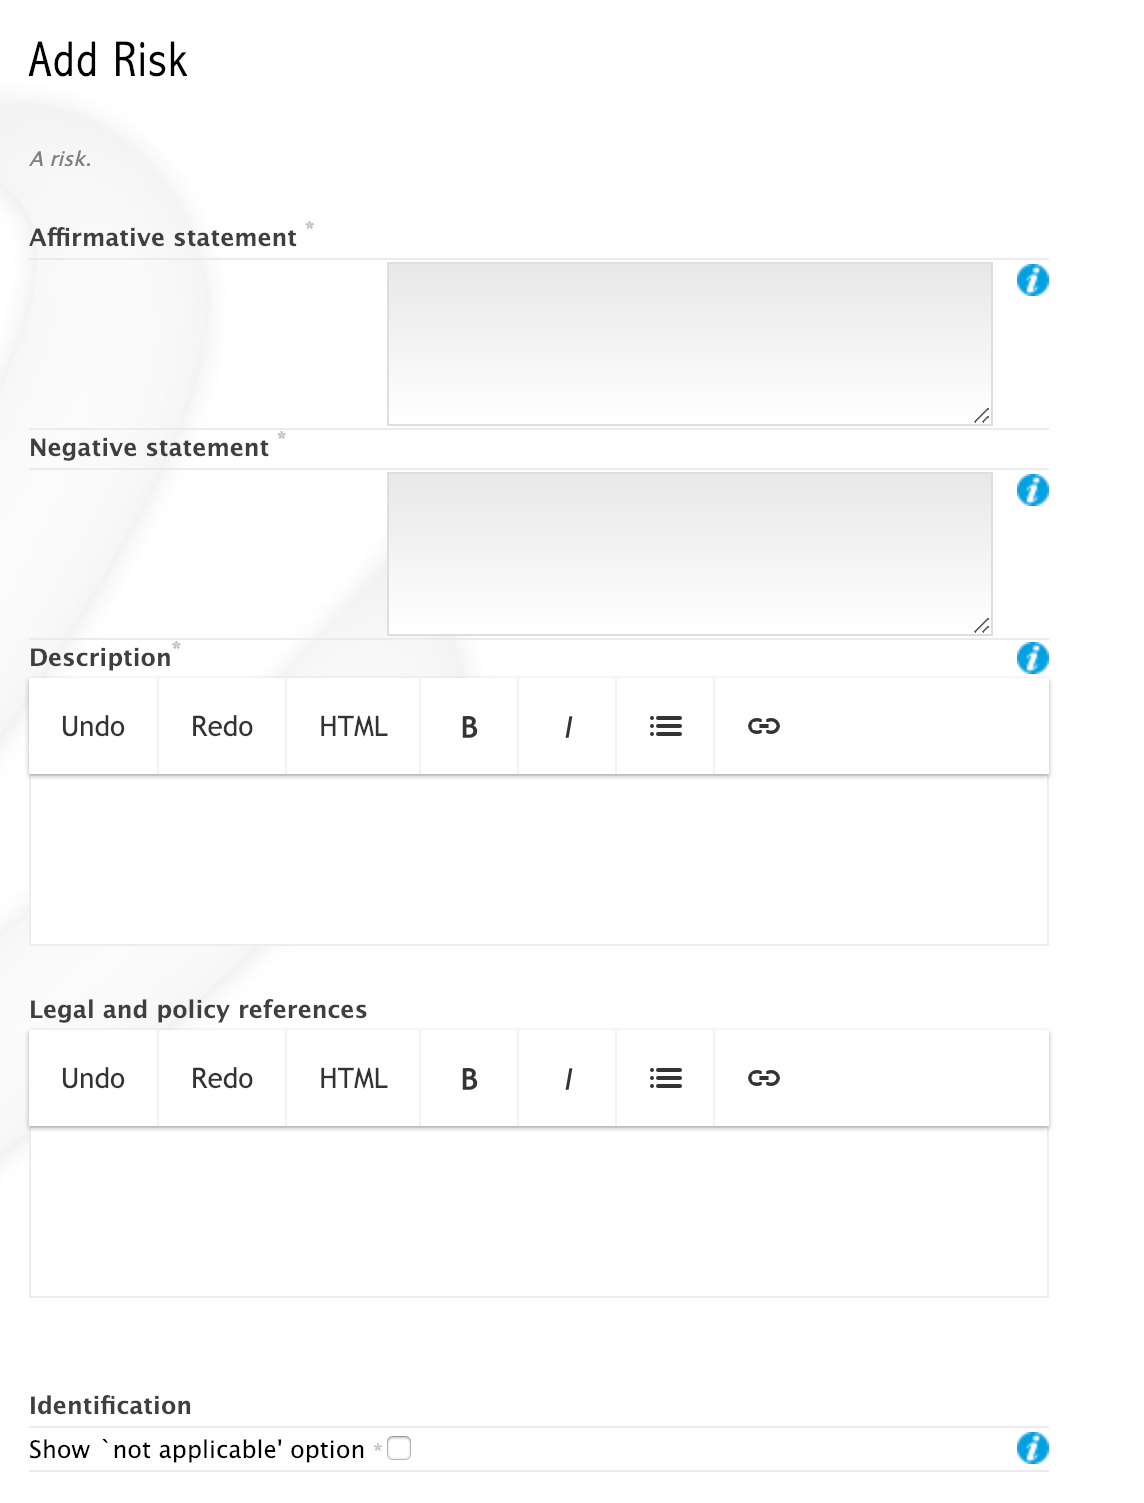
The “Add Risk” form, upper part
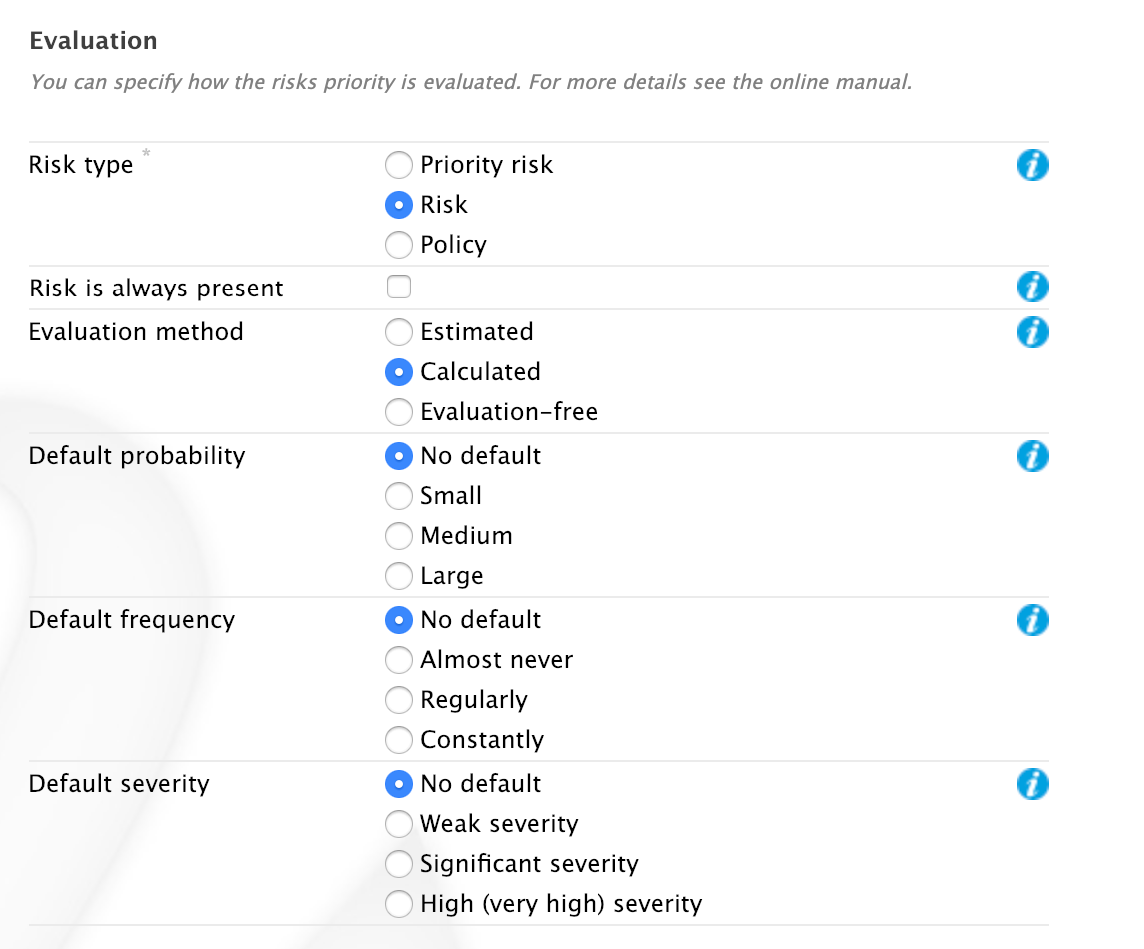
The “Add Risk” form, middle part (Evaluation)
The “Add Risk” form, lower part (Images and additional content)
- Affirmative Statement:
Write a short affirmative statement about a possible risk
- For example:
- The floors are free of obstacles.
Put a full stop after the statement. For more information on how to properly formulate risk statements, see the section on formulating risks below.
- Negative Statement:
This is the inverse of the affirmative statement. This field is mandatory as the negative statement will appear in the Evaluation and Action plan steps (i.e. if the end-user answers NO to the affirmative statement).
Note: the negative statement doesn’t necessarily have to be a simple negative version of the positive statement, since saying “no” to the positive statement can lead to different conclusions.
- For example:
- The floors are not free of obstacles.
- The floors might not always be free of obstacles.
- It is not guaranteed that the floors are always free of obstacles.
- It is possible that floors are sometimes occupied by obstacles.
- Description:
Describe the risk and provide the end-user with any relevant information. This is a formatted text field, so you can create links to useful external pages providing additional relevant information.
For example in the statement above, put a clarification/explanation of the exact meaning of the type of obstacles you refer to.
- Legal and Policy References:
- Provide relevant legal information related to the risk/topic/issue. This is a formatted text field, so you can create links to useful external pages providing additional relevant information.
Identification:
- Show ‘not applicable’ option
If ticked, the user will be presented the possibility to answer with Not Applicable. Otherwise they only have the options Yes or No.
This is useful for risks of which you can’t predict whether they will be relevant to all end-users or not.
Evaluation:
Risk type: There are 3 types of risk which you can choose from.
Risks that have been identified by the end-user, need to be assigned a priority, and the risk’s type determines what this priority will be or how it will be calculated.
- Priority risk:
Refers to a risk considered by the sector/authorities among the high risks in the sector.
Risks of this type automatically receive a priority of high, so end-users will not be asked to evaluate them.
If you choose this option, all subsequent fields under the Evaluation section in the form will disappear (since they won’t be applicable anymore).
- Risk:
Refers to the existing risks at the workplace or linked to the work carried out. Should be used for standard risks/the majority of risks in your tool. To identify and evaluate such risks it is often necessary to examine the workplace (to walk around the workplace and look at what could cause harm; consult workers, etc.).
For this “risk” type, the developer has to choose an evaluation method. The developer can choose from three options of evaluation methods:
Estimated:

When choosing “Estimated” as the evaluation method, you also need to set a default priority.
During the Evaluation phase of the OiRA tool assessment, the end-user will determine the priority of a risk by selecting a value of high, medium or low. The developer can also choose a default priority that will appear to the end users who can nevertheless overrule it.
- Calculated:
In this case, the risk’s priority will be automatically calculated from the values of 2 or 3 different criteria, depending on the evaluation algorithm employed by the OiRA Tool, selected when you create the tool. For each criterion the developer can choose a default or leave the “no default” option(s). Providing a default gives an orientation to the end user how to evaluate the risk. However the end-user is always free to overrule the default recommendation.
If the evaluation algorithm is the Kinney method, then the 3 criteria are:
Probability: How high is the probability that this risk will occur?
Frequency: How often is one exposed to this risk?
Severity: How severe is the danger posed by this risk?
If the algorithm is the simplified, 2 criteria version, only severity and frequency (sometimes also referred to as exposure) are used as criteria.
The values for these criteria are supplied by the end-user during the Evaluation phase, but you, as the developer, are able to provide default values.

When choosing “Calculated” as the evaluation method, you may also set the default values for the calculation parameters.
- Evaluation-free:
In this case, you must set the priority to a fixed value. The end-user will not evaluate the risk at all, because it will not show up in the evaluation phase.

When choosing to let the user skip the evaluation, you need to set the priority yourself.
Option “Risk is always present”
If this option is selected, then the end-user will always see this risk as being present when they are filling in the OiRA tool in the client. It will behave as if the user had answered “No”, but without the possibility that the user can change this answer. All available evaluation methods can be used with this option. Compared to regular risks there are no differences regarding the action plan.

An info-bubble informs about the consequences of selecting this option.
Note
To be able to choose the best evaluation method, you should liaise closely with the country manager and make sure the tool follows the country’s approach for risk evaluation. Also take into account the target group of micro and small enterprises and make sure the tool takes a simple and straight forward approach.
- Policy:
Refers to agreements, procedures, management decisions regarding OSH issues. These issues can be answered behind a desk (no need to examine the workplace).
Risks of this type are strictly speaking not risks and therefore won’t be evaluated by the end-users (during the Evaluation phase of the risk assessment). They are “high priority” by default.
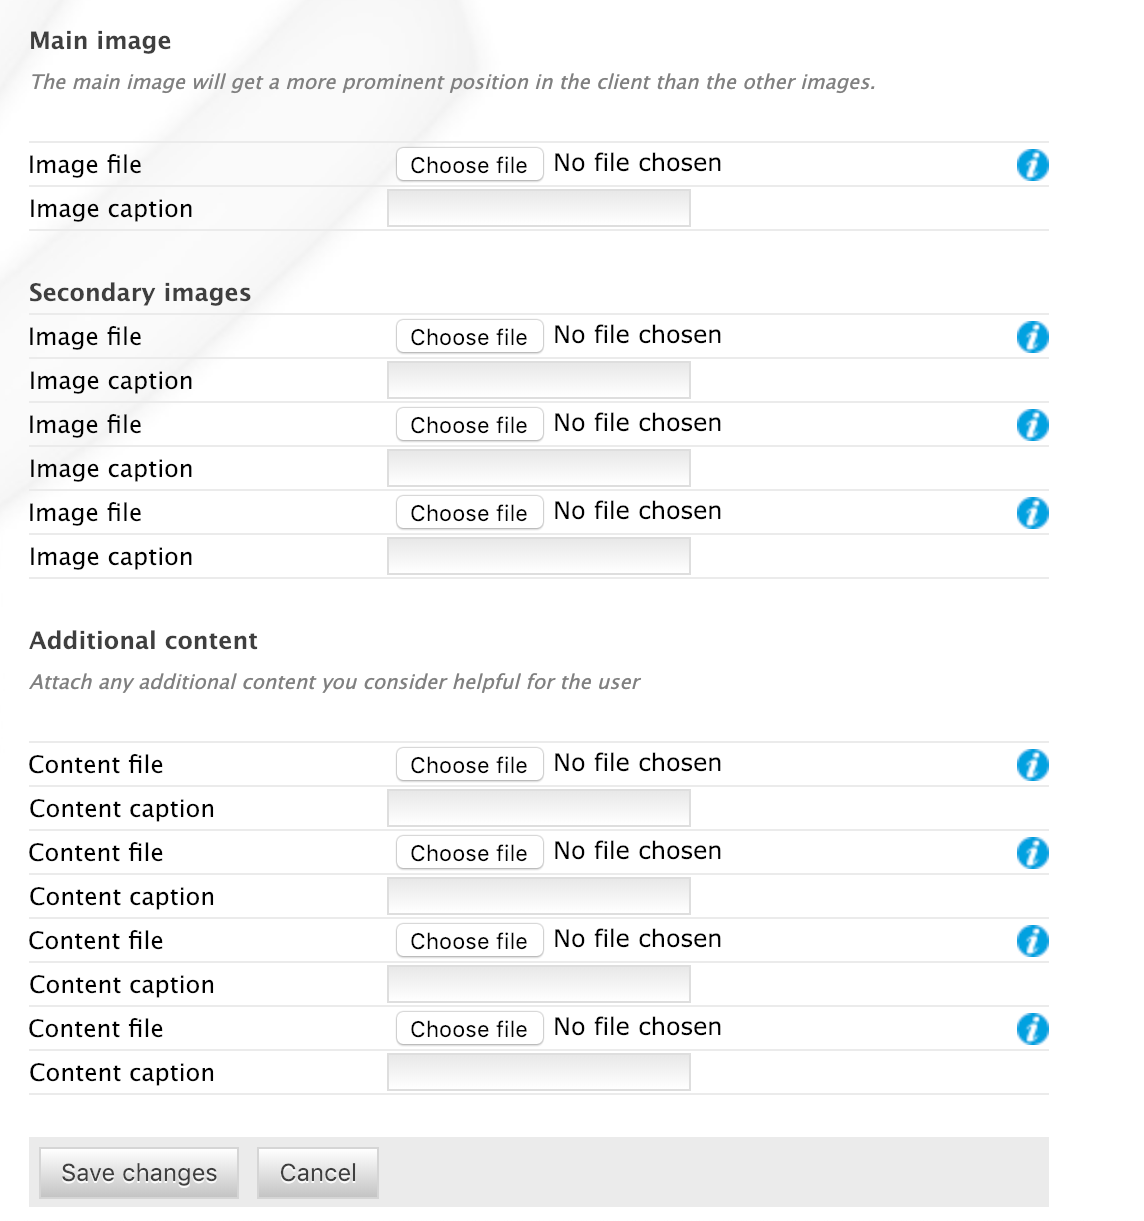
Main Image and Secondary Images:
On the risk page you can add images. One Main image, which will appear on a prominent position and up to three secondary images, which will appear below. You should use these images to help describe the risk situation and eventually also the correct situation as a contrast.

The The section on the risk edit form for adding images
You will have to upload these images yourself. Make sure that the images are clear and legible, and use a high resolution, so that the image will be displayed well in all devices. A size of 1500 by 1200 pixels is the recommended minimum. If an image is larger than required, it will be scaled down automatically - you do not need to take care of this yourself.
When you have found a suitable image, select it from your computer by using the Choose file button. The location and file name will appear in the field.
This function will only allow you to upload images with a “gif”, “jpeg/jpg” or “png” extension. Any other files will first have to be placed onto a website and can be linked to from the text.
Additional Content
If you have additional content (files such as PDF, Word or Excel documents) that can help explain a risk situation, you can add up to four such documents here.

The section on the risk edit form for adding additional content
In the OiRA application, the user will see a link to each of the uploaded files that allows them to download them. If you provide a caption for a file, this will be displayed to the user, otherwise the file-name will be shown:

Additional content shown in the OiRA application
Once you are done, click on Save (at the bottom of the page).
Formulating risks
Risks should have the form of statements. Avoid words such as not / no / never in the affirmative statement (and also in profile questions). Given that the end-user can only answer with ‘Yes’ or ‘No’, a statement containing the word ‘not’ combined with the answer ‘No’ can lead to confusion.
For instance, the following statement:
There are no obstacles or trailing cables on the floors
should be reformulated to:
Floors are free from obstacles or trailing cables
When reformulation is not a possibility, try to clarify with an explanation in the description what will happen when the end-user answers with ‘No’.
For example:
By answering ‘No’, there is a risk, when answering ‘Yes’, there is no risk.
Note
For all statements, the answer ‘No’ always indicates that there’s a risk and the answer ‘Yes’ indicates there isn’t a risk.
Any answers other than Yes and No are not possible, except for Not Applicable if that option has been selected.
Solutions and Measures
One of the goals of this tool is to help users with information on how to solve problems they encounter during the process. This is done by providing typical solutions to general problem areas (by module) or measures for addressing specific problems (by risk).
Solutions - at module level
Edit the module and add the text in the “Solution” field. This text should contain an approach for the user on how to tackle the risks described in that module in a general way. This information will be displayed in the Action Plan on the module level before the specific risks of that module are handled.
Measures - at risk level
It is most comfortable for the end-user if you provide one or more measures for each risk, because then the user will be able to pick measures with a click to pre-populate the action plan form.
A measure is related to a concrete risk. On a risk, click on Add Measure in the grey bar to open the Add / Edit form.

The “Add Measure” form
Description:
This is the heading that will appear in a drop-down in the Action Plan phase of the client; it is the first and only information the end-user will see before actually selecting the measure, so it needs to be informative, but as short as possible.
Start with words which reflect the core message of the measure, for example: Information and instruction on personal protection measures, and then offer the rest. This text helps to get the end-user started and explains the possibilities.
- General approach (to eliminate or reduce the risk):
Describe what is your general approach to eliminate or (if the risk is not avoidable) reduce the risk. This text will be incorporated into the Action plan.
- For example:
- Ensure the correct means of Personal Protection are used, according to…
- Specific action(s) required to implement this approach:
Describe the specific action(s) required to implement this approach (to eliminate or to reduce the risk).
- For example:
- Appoint person responsible for information on and provision of personal protection measures
- Set a date for an information session and invite staff
- Check if personal protective equipment is sufficient and well maintained
- …etc.
- Level of expertise and/or requirements needed:
Describe the level of expertise needed to implement the measure,
- For example:
- Common sense (no OSH knowledge required)
- or
- No specific OSH expertise, but minimum OSH knowledge or training and/or consultation of OSH guidance required
- or
- OSH expert
You can also describe here any other additional requirement (if any). For example: budgeting, training for Prevention/Safety staff, incorporating this subject in team meetings, etc.
If the end-user selects this measure it will be copied over to the Action plan. The end-users can rework and modify the supplied text.

OiRA client: the pre-defined measures are available as pre-fill

OiRA client: the text fields of the measure have been filled with the pre-defined statements
Once finished, click Save changes at the bottom of the page.
Important: If your OiRA tool allows the user to define measures that are already implemented, then all the measures that you define here will be available for selection already in the Identification phase. See the respective chapter on this kind of OiRA tool.
Checking your OiRA tool
When all the work has been done, i.e. the structure and contents have been completed, you can preview your OiRA tool (prior to making it public) following these steps:
Make sure you have an end-user account in the OiRA tool (https://oiraproject.eu/oira-tools/) You create an account in the OiRA client here https://oiraproject.eu/oira-tools/@@register
You can also use the testing session, but you won’t be able to generate a report within a test session account.
In the Versions drawer (see OiRA tool versions) on the right hand, chose the version you want to preview and, click the Preview link next to your OiRA tool version.

The versions drawer
Then click Create preview

The preview confirmation form
Click on the Preview URL
Log into the tool with your end-user account
View your (still unpublished) OiRA tool
Tip
Check as many boxes as possible on the profile page, answer the filter questions with ‘Yes’ and the risks with ‘No’. This way you will view all risks and possibilities.
When you discover faults in the preview you can amend these in the OiRA tools generator. Access the Preview again to check your modifications.
Note
The preview is stored in a separate place on the server, it won’t be viewable to the end-users until you publish the OiRA tool.
Publishing an OiRA tool
Once you have successfully completed all steps, it is time to publish your OiRA tool.
Go to the right hand menu, click on the version of the tool you want to publish and click on “Publish”.

Publishing your OiRA tool
Note
It can take some time to perform this action.
When you click on Publish, you will be asked if you are sure you want to publish the tool. Before confirming, copy the URL (link) of the tool that is provided on this page and save it in a secure place (after the confirmation, the URL will disappear). This URL will be the access point of your tool in the OiRA client.
A confirmation message will appear in a green bar:

Publish confirmation message
From now on, the public can view and complete your OiRA tool. In case of a new OiRA tool, contact the OiRA team at EU-OSHA at least two weeks before you publish the tool. This way EU-OSHA can ensure that your tool will be included on the OiRA project site (http://www.oiraproject.eu). You don’t have to notify the OiRA team when you have done minor updates and published again the same OiRA tool.
Special OiRA tool with already implemented measures
The standard structure of a risk assessment in OiRA for the user looks as follows:
- A positive statement is presented that describes a desired state, such as “Regular maintenance is performed”.
- The user can either confirm this with a Yes (no risk present) or decline with a No, meaning that the desired stated is not (yet) present.
- In this case, the OiRA tools knows that this risk is present at the user’s organisation. Therefore, the user needs to handle this risk in the Action Plan, and plan measures to mitigate this risk in the future.
In other words, OiRA assumes by its structure that a user always starts a risk assessment from scratch: OiRA helps the user to identify a risk, and then plan preventive measures.
In reality, many organisations might already have given thought to their situation regarding safety and health at work. For at least some of the risks that affect a workplace, preventive measures might already be in place. Example: A hazardous area has been fenced off, a warning sign has been placed, personal protective gear is being used, …
In a standard OiRA tool, the user can only plan for measures that are still required. But it might be desirable to also document the measures that have already been implemented, for example in a report that documents the overall state of the risk assessment and prevention.
Therefore, an OiRA tool can be switched from the ”Classic” (i.e. standard) variant to a type that enables the user to define measures that have already been implemented. It is up to the national partners to decide which kind of tool (the standard one or the one including measures already in place) is the best option. If you are working on a sectoral tool, liaise with the national OiRA partner.
See the chapter about editing an OiRA tool on how to switch the type of tool.
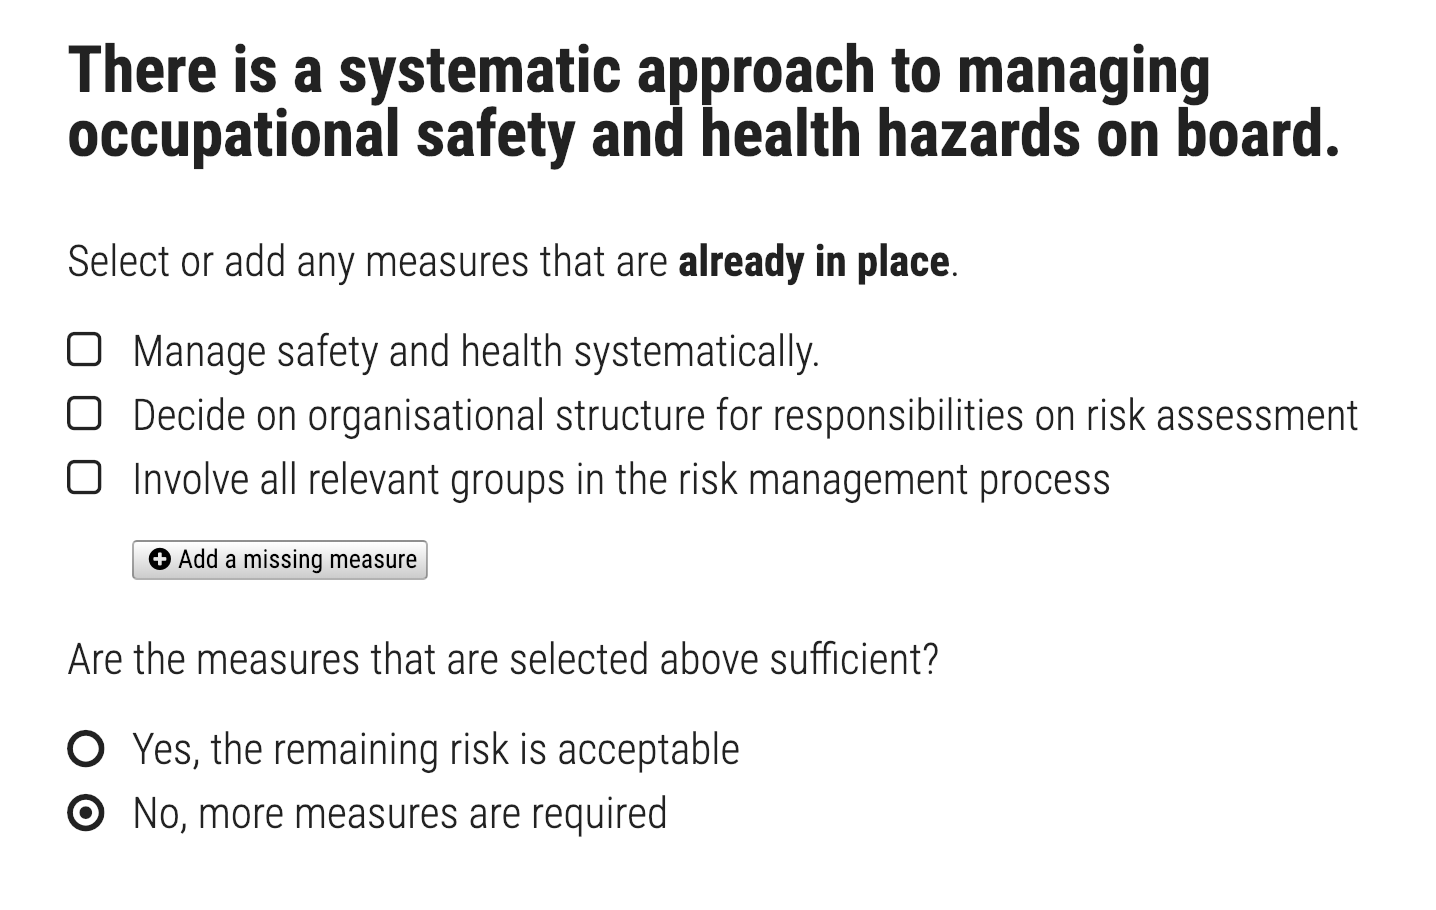
OiRA client: risk statement, with suggested measures shown to the user that they can mark as already being implemented
This will have the following effect in the OiRA application for the end-user:
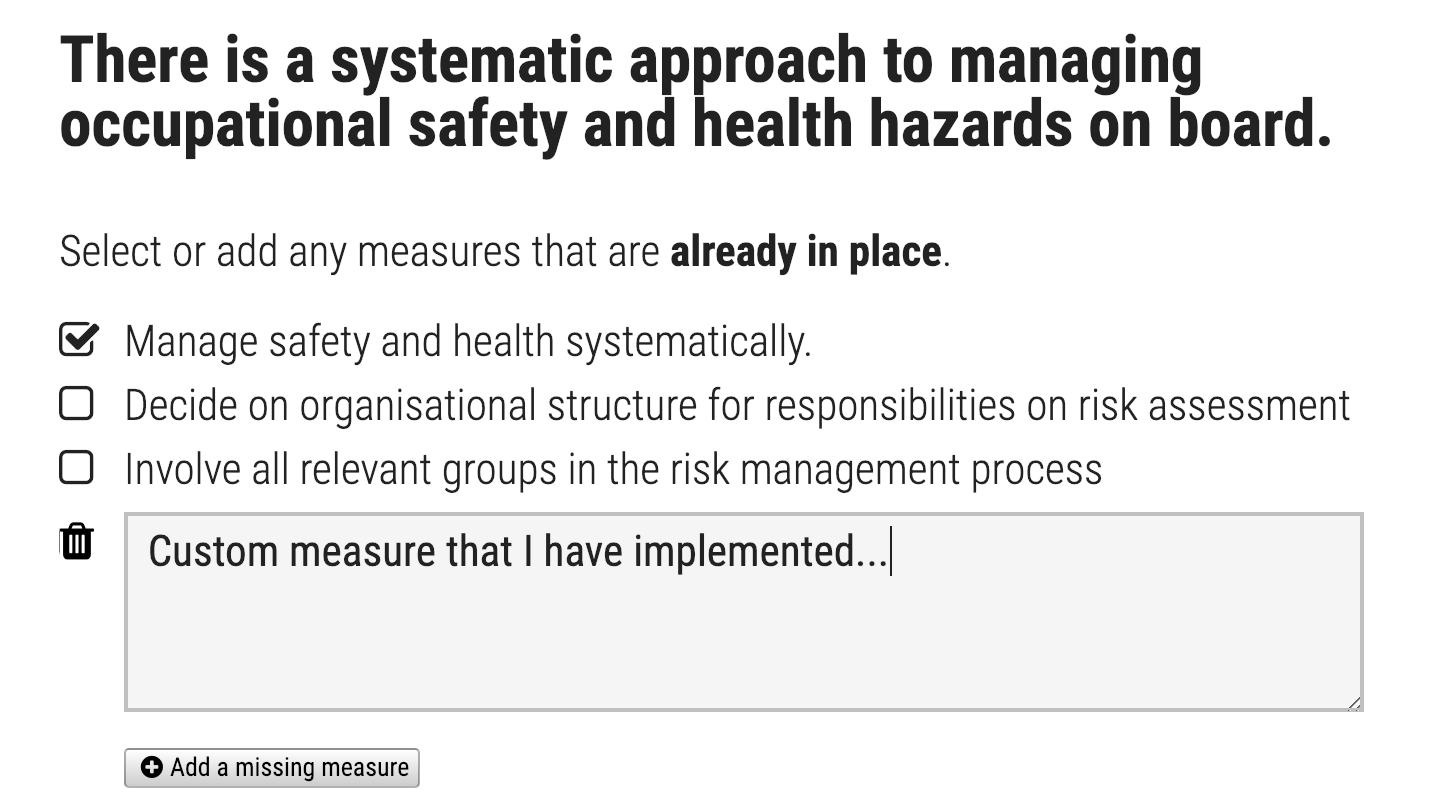
- On each risk in the identification phase, an additional instruction will be displayed after the risk statement: “Select or add any measures that are already in place”.
- All measures that were defined by the tool creator for this risk are shown as selectable items to the user.
- Apart from selecting (= confirming) the appropriate items, the user can also add additional measures that have been implemented in their organisation to tackle this risk.
- The actual identification is pre-fixed with a question: “Are the measures that are selected above sufficient?”, to make it clear that the assessment of the risk needs to consider the concrete situation in the user’s organisation. The Yes / No answer does not relate to the risk statement - unlike in the standard version of an OiRA tool.
- The answers below have the same effect as in a classic OiRA tool: “Yes (the remaining risk is acceptable)” means that the risk is under control and will not appear in the Action Plan. “No (more measures are required)” means that the risk will be added to the Action Plan so that further measures can be planned.
OiRA client: the user has selected one pre-defined measure and written text for an additional custom measure.
Handling of measures text:
If you are using the Measures in place type variant for your OiRA tool, you can choose between two versions to display the suggested measures:
- Full (show Description and General Approach)
If you have additional descriptive text to each measure besides a single statement, you can choose this option to offer that extra information to your users.
In this case, the Description defined by the tool creator for this risk is shown next to the checkbox to explain the measure. When hovering that, the General approach text is displayed in a tooltip.

OiRA client: full display of measure in place with tooltip.
After choosing the related measure by ticking it, the General approach text is displayed below the measure’s Description.

OiRA client: full display of measure in place when selected by the user.
- Simple (show only General Approach)
If you do not have that much information about a measure, and might have the same text used for Description and General approach, you might want to use the simple setting here.
With this setting, there will be no tooltip shown but only the Description next to the checkbox. Also when the checkbox is active, no additional text is displayed.

OiRA client: simple display of measure in place.
For both settings, the Description is displayed in the list of additional measures. This list is offered in the “Action Plan” step, that means if the user has answered the risk statement with “No” / “More measures are required” or on priority risks.

OiRA client: list of additional measures to add.
When adding an additional measure, both - Description and General approach are used to explain the measure.

OiRA client: additional measure added.
In the Action Plan, all measures that have already been implemented are shown for information. Since there is no action required for them, they cannot be edited or scheduled. But new measures (to be implemented in the future) can still be added just as with a classic OiRA tool.

OiRA client: the action plan page for a risk showing two measures that are already in place above the form to add new measures.
OiRA tool feature “Integrated action plan”
If the setting “Integrated Action Plan” is selected for a tool, the action plan will be included in the risk identification and evaluation step.
For the standard OiRA tool without the integrated action plan, there is a single step “Action plan” following the step “Identification + Evaluation” in the main menu of the tool:
- Preparation
- Involvement
- Identification + Evaluation
- Action plan
- Report
- Status
For an OiRA tool with an integrated action plan, these three steps are unified to the step “Assessment”:
- Preparation
- Involvement
- Assessment
- Report
- Status
If the integrated action plan feature is used for a tool, the the elements described under ‘Action plan’ will appear under the identification and evaluation of each risk.
User testing conducted at the end of 2020 has shown a slight preference for having the Action Plan step integrated into the general identification and evaluation process.
Important: the feature “integrated action plan” can be turned on or off for existing tools. All data that users working with this tool have entered will be kept. It is only displayed in a different way regarding the selected option.
Re-working a published OiRA tool
In the life-time of an OiRA tool, changes will become necessary, e.g. due to changed legislation, based on user feedback or following re-structuring inside a sector. This chapter provides you with guidelines to follow when you want to make changes to an OiRA tool that has already been published.
The most important aspect to consider is the impact on existing users of this OiRA tool: Will the changes that you want to introduce cause existing users to lose (parts of) their answers? Will a user who has already done a risk assessment based on your tool still be able to download the report for it?
Here are some considerations to help you decide how to proceed:
Changes that are not critical
If you simply add new risks or modules, then existing users will see the new contents (modules and risks) appearing in their existing session, without answers of course.
This kind of change is not critical. Existing users only need to fill in the blanks when they return to their saved sessions.
In similar fashion, you can update already existing modules, sub-modules, risks, profile questions or measures in place. This means: in the CMS, you might change title, description, type of risk, attachments, etc. Existing users will simply see the updated texts, images, etc., but their answers stay intact.
This kind of change is also not critical. Exception: the change in wording changes the meaning of a risk statement or similar in such a way that a previous risk assessment is no longer valid.
For such non-critical changes, it is safe to do the changes in place, so that the URL of the OiRA tool will stay the same. More details below under “Option 1”.
Also - as described under OiRA tool feature “integrated action plan”. the feature “integrated action plan” can be turned on or off for existing tools. Even if data was collected as your users are already working on that tool, the data does not get lost.
Changes that require special attention
Any change to the structure of an OiRA tool is potentially dangerous with regards to the answers of existing users and will have to be done in a different way. Examples:
- A risk gets moved from one (sub-) module to another.
- A module gets moved into a profile question (or the other way around).
- Two modules get combined into one, or one module gets split into 2 modules.
In all these case, the affected risks / submodules receive a new “parent” in the tool. For existing risk assessments, the software will then not know any more that the answers from the user (the Yes/No + the measures) belong to a risk that has a different parent. That means, the answers will be lost.
Therefore, for changes that affect the structure of an OiRA tool, the recommendation is to create a new tool that has a different URL than the old version. This will allow existing users to keep accessing their risk assessment (including the report) under the old URL, while all new users will be sent to the new URL of the tool. More details under “Option 2”.
The potential drawback is that all users who want to benefit from the new version of the OiRA tool need to perform the risk assessment from scratch. This is not relevant for new users, but existing users will have to answer all questions again, in case they want to use the new version. It is not possible to copy over previously given answers or measures.
Conclusion: Think carefully about changes on your tools since these might cause extra work for the end users.
Option 1: Reworking / improving a tool in place
The simplest form of making changes in place is to edit the risks / modules in the CMS and then re-publishing the tool when you are finished. This is especially relevant for minor changes like fixing typos, adjusting links, etc.
For larger changes (but ones that do not affect the structure), you might want to keep the current version in the CMS and apply your changes in a new version (of the same OiRA tool). This can have the benefit that you can already work on the changes for the new version. But it will allow you to still make adjustments to the current version (e.g. fixing typos) without having to make all changes live. Once you publish the new verion, the existing tool in the client will be replaced by the new version (under the same URL).
See the chapter on OiRA tool versions on how to create a new version.
Note
Changes done on an existing OiRA tool will only become visible to the end user when you publish the tool again. See Publishing an OiRA tool.
Option 2: Creating a new version in a separate location
Create a new OiRA tool, pick the option “Base my new OiRA Tool on an existing OiRA Tool of my organisation” and select the old tool you wish to copy from.
The new OiRA tool will be created in a new location as a copy. All modules, profiles, risks, etc. are copied. You can now safely re-arrange the structure.
And when you publish the OiRA tool, it will have a different URL.
Communication aspects
These are especially relevant for option 2.
Prevent new users from using the old tool
Any user who has an existing risk assessment from the old version will still see it when they log in to OiRA on the list of available sessions.
But you want to prevent new users from starting a new session of the old version. Therefore, the old version of the tool needs to be marked as “obsolete”. This will prevent it from being displayed in the list of available tools in the OiRA client (under “Start a new session”).

List of available tools shown to the user
To mark an OiRA tool as obsolete, edit the OiRA tool (not an OiRA tool version!) in the CMS and tick the check-box “Obsolete OiRA tool”. The OiRA tool version then needs to be published again for this change to become active.

Marking an OiRA tool as obsolete
The following screenshot emphasizes the difference between an OiRA tool and an OiRA tool version.

Three OiRA tools, marked in red, each with one or more versions
Inform existing users that a new version available
Even though existing users of the old version might be content to just access their answers and the reports under the old URL, they might benefit from the new version of the OiRA tool. This might be relevant for example when the OiRA tool was adapted to a changed legislation.
Apart from communication channels outside of the OiRA application (e.g. the OiRA website, the website of your organization, newsletters, etc.), you can also place a message directly inside OiRA that gets shown to users who access the old version.
See the section about adding a custom notification on how to achieve this.
Unpublishing a tool
A tool can be unpublished. Unpublishing makes a tool unavailable in the OiRA client. Any saved sessions will be retained and can be accessed again if you re-publish the tool later.
You do not need to unpublish a tool to make modifications.